
Replacing valve cover gaskets on a Mercury Villager
This past weekend I helped a friend by replacing the valve cover gaskets on his Mercury Villager. Working on this engine reminded me of why I love Jeeps so much.
This is a sideways mounted V 6 engine. This means that the rear valve cover in under the firewall and behind the intake manifold. The intake is at least made in two pieces so you can take off the top part without having to remove it from both the heads.
Ed’s van was literary pouring oil out of the rear valve cover every time he headed up his steep driveway. Before diagnosing the problem, we thought it had to be a pressurized oil leak like the oil pressure sender or something due to the huge amount of oil it would leak.
However, close inspection showed the line of oil began and ended at the valve cover to head joint. Only the rear one. The front cover was not leaking.
This van is actually a re tagged Nissan Quest. I loved the old Nissan L series engines. They were extremely reliable and easy to work on. There were only a couple of special tools needed for the whole engine. And every part was easy to get to. Not so on this little V6.
From reading the internet forums, it seems common for the valve cover gaskets to fail at 100,000 miles. My Jeep engine has 330,000 miles on its original valve cover gasket. The old L series Nissans had a simple cork gasket that lasted me well over 100,000 miles.
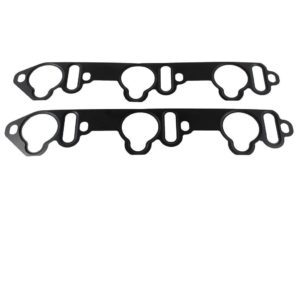
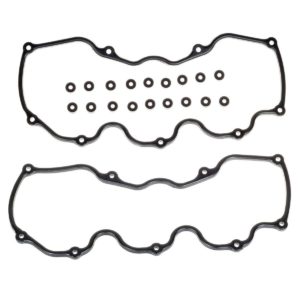
This engine, however, has a strangely shaped rubber gasket that cost $20 for the pair. The most expensive part of the job, however, was getting the intake gasket that only came in a set and cost $40. I only needed one of the gaskets from the set but it was not available separately except from the Nissan dealer. My nearest Nissan dealer is over an hour away.
The manifold at first seemed impossible to remove. There are two hard water lines attached to the bottom of the manifold that attaches via short hoses to pipes attached to the engine. You can’t access the clamps without raising the manifold and you can’t raise the manifold without disconnecting the hoses.
I finally figured out I could raise the right side of the manifold just enough to access the clamp and pull off the hose. Then I could work on the other one. I seriously considered cutting the hoses. But one is a specially shaped hose that I am sure is dealer only and who knows what it cost.
Also complicating the issue is that the EGR valve is connected the manifold by two L-O-N-G studs and to the exhaust by a hard metal pipe. The EGR valve won’t move much so you have to pull the manifold out of the valve on the long studs.
After pulling off the right hose, I could raise it enough to get the left hose off and then pull it loose from the EGR. That is after figuring out how to disconnect the vacuum line to the brake booster. There is also a hidden sensor wire that can only be disconnected while you hold the manifold up. Of course, there is no room to have anyone helping, so you have to balance it all in one hand and disconnect the wire with the other.
Luckily Ed’s van is dark red so the blood stains don’t really show much. There is a very sharp flange just under the windshield wipers that I hit my hand on as I was pulling loose the last of the lines.
Once the manifold was out of the way, the Valve cover is still not easy to get to. It is way back under the firewall and several of the screws required a stubby screwdriver to operate. Oh, I forgot to mention, the valve cover is not held by real hex head or even Torx bolts. It is held down by 9 number 2 Phillips screws!
I hate Phillips screws because you have to hold constant pressure down on the screwdriver while turning to prevent stripping out a tight fastener. This is very difficult to do while stretched over the engine compartment on fasteners you can’t see.
Once the screws were out and the crankcase vent line disconnected, I was able to pull the valve cover. It simply fell off as the gasket was completely degraded. There were two spits in the gasket that allowed oil to simply run out from under the cover. The remaining part of the gasket crumbled as I removed it from the cover. The new gasket was very flexible and much thicker showing just how the old one had degraded from the heat.
Thankfully cleanup of the head was as easy as wiping with a rag because it would have been next to impossible to get a scraper in there to clean up any stuck gasket material.
With the rear cover back in place, I focused on the front cover which was not leaking but I knew would have the same degraded gasket. Besides, there were two in the kit.
This one looked like it would be a breeze to remove as you can look straight down on all eight screws. Wait a minute! The rear cover had nine screws? After removing the eight screws, the cover was still attached. Careful inspection showed there was a ninth screw. It was under the distributor!
Not under the distributor cap but under the distributor itself. This means that you have to completely remove the distributor from the engine taking a chance on changing the ignition timing.
Thankfully someone had made a nice paint mark on the distributor earlier so I could tell exactly where to put it back. I failed, however, to mark where the rotor pointed before pulling with great force to break the seal of the O ring on the distributor housing. The distributor popped up and of course, twisted as the helical gears disengaged from the cam. I marked where I thought it had been and continued.
The front cover was much easier to remove and clean after the distributor and the knock sensor was removed than the rear one had been.
I cleaned it up and put it all back. I carefully aligned the rotor with my mark and the distributor with the previous mark.
Next came the seemingly impossible task of replacing the intake. The two hoses and the EGR valve all seem to have to be connected at once and at three different angles.
After several trial fits, I figured out that the only way to make it work was to slip the EGR part way on the studs, then connect the left hose and then the right one. The trouble was once all that was accomplished there was no way to put the spring clamp on the first hose. I needed a longer pair of pliers than I had in my toolkit to accomplish the task.
I eventually replaced the spring clamp with a worm drive clamp so that I was able to tighten it through one of the little gaps in the manifold using a nut driver. It looked like it was all going well until I noticed that the sensor wire was not connected and it need to have been connected before I sat the manifold down. After much work, I was able to fish the wire under the manifold and eventually connect it to the connector on the back of the engine. I added a bit more blood to the underside of the cowl in the process.
With all the hoses connected I finally was able to slide the EGR valve home and tighten the nuts. Then I began the process of hooking back up all the other wires and vacuum lines that connect to the throttle body and idle air control valve.
I finally got the intake airlines reconnected and the manifold bolts tightened and it looked ready to crank when I noticed I had forgotten to put the mass air flow sensor back in. It just clips in place and I had only removed it to help get my arm in behind the engine.
At that point I had my assistant try to start the engine. The engine would turn over but felt like it was trying to backfire. It would hardly turn with the starter.
At this point, I remembered the rotor position was not certain so I pulled the distributor again and moved the rotor one tooth. I put it all back and had my assistant try the key again.
This time it started and ran perfectly. There was much rejoicing as we let it idle and warm up to check for water leaks. Finding none, we drove it back to Ed who was very happy to have his van back.