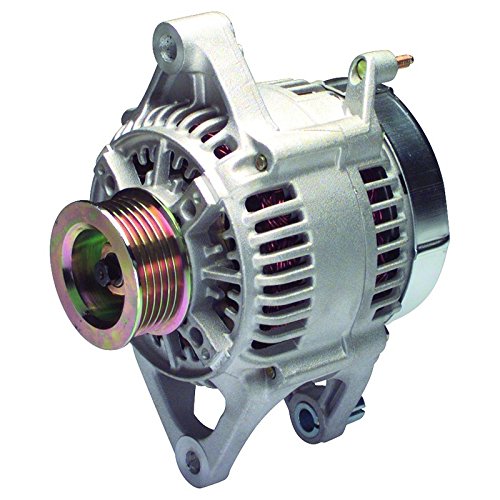
How to change the alternator on a mid range XJ

Jeep Performance Improvement Ideas
How to change the alternator on a mid range XJ
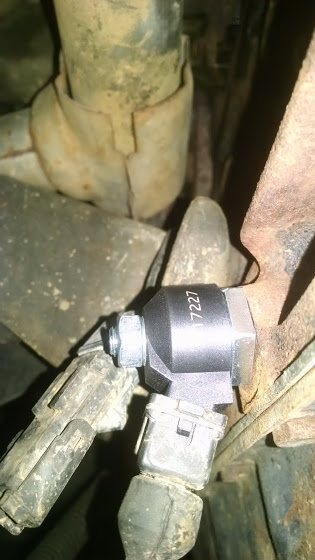
How to replace the knock sensor on the Jeep Renix engine.
The knock sensor is used by the Renix engine control system to fine tune the ignition timing. If it hears knock it will back off on the timing a bit. It will run the ignition timing as far advanced as it can to get the most power and fuel economy.
Continue reading “Renix Knock Sensor replacement”On the last few cold mornings, I noticed the heater in my Jeep Cherokee was not putting out heat like I wanted. I also noted that the temperature gauge was not reading as high as normal.
I knew that the thermostat must be opening too soon. The only cure is to swap it out.
I picked up a Stant Supersat at Advance Auto. I used the order online – pick up at the store option to save a couple of bucks.
My Jeep is equipped with a K&N air filter and intake tube so I don’t have an air box in the way any more. I loosened the power steering pump and moved the drive belt out of the way of the thermostat housing. I have done it without loosening the belt but it is much easier with out the belt in the way.
The later model XJs have the belt routed where it is not in the way. However, on an earlier XJ like my 91 the belt interferes with getting the bolts started back in the housing. I previously wrote about changing a thermostat on a 99 XJ.
I popped off the radiator and heater hose. I disconnected the temperature sender wire.
I then removed the two 1/2 inch head bolts and popped the housing off the block. I set up a pan under the Jeep to catch the antifreeze. I also laid out newspaper to soak up the splatters as anti freeze is very slippery on the floor.
I cleaned up the bolts and the housing using the wire wheel on my bench grinder. I then use a scraper and a scotch brite wheel in my drill to clean the block face.
I noticed that the new thermostat did not have a bleed hole in it, so I drilled a small hole in the flange. It is hard to bleed all the air out of a 4.0 if there is no hole in the thermostat. Most of the ones I have bought lately have a hole but this one did not. So, I made one.
Getting the new thermostat to stay in the block while setting the housing is always tricky. I knocked mine out the first time and only noticed it when the antifreeze started to run out as I was filling the system.
I put a dab of Permatex on the flange to get the thermostat to hang in place long enough for me to slip the thermostat housing in place over it. I used additional Permatex to make the gasket stick to the housing. I held the housing in place with one hand while I started the bolts with the other hand. I was able to get it all in correctly on the second try.
I tightened the bolts and left the hoses off until I filled the system. I then reattached the hoses and filled the radiator completely with anti freeze. I then put back the temperature sender wire.
I put the belt back on and started the engine. I checked for leaks and made sure the engine came up to the proper temperature. I let it cool and topped off the radiator with coolant. I enjoyed having a nice warm heater again this morning.

Stant Superstat Super Premium Thermostat, 195 Degrees Fahrenheit – 45209
Replacing the steering box on a Jeep Cherokee
The steering box on a Jeep Cherokee rarely goes bad. Mine has over 345,000 miles on it. However, I recently changed one that had been damaged in an engine fire. These instructions will also help if you want to upgrade to a larger steering box.
Begin by removing the air box and electric fan to gain access. Remove the hydraulic hoses. The fittings at the box are 18mm. It may help to have a crow foot line wrench but I always make do with a stubby 18 mm open end.
Remove the bolt that secures the sector shaft to the box. It may not look like it, but the bolt has to come all the way out to release it from the splines. Use a pry bar if necessary to slip the sector shaft off the splines. Use some penetrating oil on the slip joint in the shaft if it seems like it does not want to compress. If you try to compress it and it sticks, the rubber joint at the top can be damaged.
Disconnect the pitman arm from the tie rod. You will need a tie rod puller to do this job. Be careful not to damage the rubber cup on the tie rod while removing it. Put some tension on the joint with the puller and then use a sharp strike with a hammer to free up the joint. Trying to pull too hard will likely damage the puller and not release the joint. A sharp blow from a hammer on the side of the pitman arm will pop it right out.
The box is held to the unibody by three bolts. These have 5/8 inch heads and are held in by thread locking compound. Use a long handle ratchet to get them out. There is an aluminum spacer between the unibody and the pump. Sometimes the bolts will seize in the aluminum. If the spacer breaks, you can replace it with a stack of washers on each bolt. Also, if using a larger steering box, you may have to space the box further away from the frame rail.
With eh bolts out you can lower the box down behind the sway bar. Be careful because it is heavy.
Removal of the pitman arm is difficult. Use the proper puller and possibly heat to remove it. If possible, get a replacement with the pitman arm already attached.
To reinstall, hold the box in place and start one of the bolts. It may be helpful to have an assistant hold the box from above while you align it and start the bolts from below.
Reconnect the tie rod and install the cotter key. Attach the sector shaft and install the bolt. You map have to use a hammer and lightly tap the end of the shaft in place. Alternately you can use a chisel to spread the coupling apart before attaching it to the steering box.
Reattach the hydraulic hoses. Lift the wheels off the ground and turn the steering from side to side. Make sure there is no binding. Fill the system with fluid and repeat the side to side motion. Start the engine and turn the wheels from lock to lock to purge the air from the system. Make sure the reservoir stays full of fluid while purging. It is common for the fluid to foam while purging.
If the pump sounds like it still has air as indicated by a growling sound when turning the wheel, turn to one of the stops and hold the wheel there for a second while the pressure relief opens. You will hear the valve open when you hold it against the stop. Repeat a couple of times to purge all the air.
Test drive the Jeep to make sure the steering is centered and has the proper feel. Adjust as needed.