The exploding GM limited slip differential
While towing to Track Night at Atlanta Motorsports Park I noticed a strange noise. I kept thinking it was from the trailer or the weight distributing chains. I stopped several times to

Jeep Performance Improvement Ideas
The exploding GM limited slip differential
While towing to Track Night at Atlanta Motorsports Park I noticed a strange noise. I kept thinking it was from the trailer or the weight distributing chains. I stopped several times to
Recently I came to realize that it was costing me a lot of money to keep filling my Jeep Cherokee with gas, like every three to four days. In fact, the last 10 days I know I have spent around $100 in gas just to take my kids to and from school, band practices, doctors appointments, therapy appointments and having to go get medicine.
It was a heart wrenching decision to start looking for a car to drive daily and even more difficult to share the news with my three kids who absolutely adore “Princess.” I got the silent treatment from all three of them ages 14, 10 and 7. Their biggest concern was whether or not I was keeping her.
Of course I am!
I just explained to them that Princess does need to have some maintenance work done on her so we can take her off roading like they have been wanting to do. I even told them that there may be days I may drive Princess especially when there is snow in the forecast.
It has not been an easy time looking for the “right” car. Some I have found with the perfect body yet there is something seriously wrong with the engine or transmission and in one case, the brakes not working. I have been most astounded though at the prices of the cars.
I spent over a week and a half looking at cars locally, in our local trading post paper, newspaper, craigslist (from the local to places 250 miles away) and Ebay. My original budget had been about $1,000 which when I look back at it was a joke. Rarely can you find a vehicle for that price and when you do there are bungee cords holding the doors closed, duct tape on the body, glass missing, key holes with no place to put the key just to name a few things.
Even when I bumped up the price limit to $1,500 I had a friend who visits car auctions often to be looking for certain cars. He warned me that chances are cars in that price range will look like they’ve had a rough life. I will agree!
Then it came to a point after talking with my boyfriend that if I wanted a decent car the way I wanted I would have to ask for some help. I had to break down and ask my grandfather for a little help with my car budget. As hesitant as he was, I believe he was very understanding about my situation with spending money on gas.
After a few days of looking and “watching” cars on Ebay and digging through ads on Craigslist, I finally came across one I “fell in love with.” Yes, I’ll admit I crumble when I see certain cars. I did it with my Jeep Cherokee which I immediately named Princess before the auction had ended…
The best thing about the car I found was that it was where I could get a friend to test drive it for me before making the decision to dive in and bid on it. I had missed the Buy It Now option by probably 12 hours by the time my friend test drove it. But, the most interesting thing about the car is that the guy who was selling it knows my friend from a place he worked at previously! Funny how things can be a small world.
For nearly a week I have been tormented by the whole auction ordeal. I missed the BIN by less than a day, then a potential fraudulent bidder got involved and bumped up the price right to my absolute limit, when, where and how to get the car, then trying to figure out how to get all the money together to pay for the car, just about all took me over the edge.
Actually, it was the final day that made me the craziest. I did my absolute best to keep my mind off the auction by cleaning, doing school work, washing my hair, going to do a few errands. For the most part of two days I figured the auction would end around 3 PM. That was a perfect time since that would be just before I had to go get my boys from school. Ummm, nope not so much. Try 3:50 PM. *Sigh*
Well, I had downloaded the Ebay app recently so that made it a little easier to keep up with the auction. At the same time I had a small auction going that I was selling some sandals I no longer needed. So every once in a while I would get an alert that either the bid price had gone up on the sandals or the car (I’d much rather know the bid price went up on the sandals). I remember sitting in line at my oldest son’s school and would check the final 50 minutes of the auction about every 10-15 minutes. I had estimated that it would end about the time I picked my youngest one up from school.
As it got down to 20 minutes, 15 minutes, 10 minutes and then 5 minutes my heart was racing faster and faster. I thought I was going to pass out before the auction was finished. For a day and a half the highest bid was at $2,400. I just knew at the last minute someone would outbid me (my maximum bid was $2,401.99). Lucky for me I got stuck at the traffic light through two cycles. It was one time I just didn’t care.
I remember looking at my iPhone as it got down to 2 minutes and some odd seconds, 1 minute and then into the seconds. I could feel my heart beating intensely, my hands were shaking profusely. And just as the light changed to green the auction ended.
I won!
Now to go get the car, tomorrow….*Sigh* I have no patience to be waiting
Catera Transmission revisited
The Catera transmission I installed back in December failed suddenly for its owner recently. I towed the car back to the shop and pulled down the transmission.
I found the front pump seal blown completely out of the housing and up on the neck of the toque converter. It had pumped out all the fluid as well.
I had my suspicions about the replacement seal when I put it in. However I had been assured by the supplier that it would work fine. The proper seal has three bolts that hold it in. The replacement was simply a press fit. Apparently this transmission makes more pressure than most and just forced the seal right out.
After some research, I found the proper seal on ebay. It took a few days to get but after it arrived I was able to quickly put the car back together. Luckily I had saved the screws from the last time I had the car in the shop.
I refilled it with fluid and it seems good to go again. Hopefully this time it was last a while before it returns to the shop.


How to Replace the Transmission in a Cadillac Catera.
The Cadillac Catera was designed a sport grand touring car. It is actually an Opel Omega built in Germany. When it was introduced, the automotive magazines sang its praises loudly. The car drives and handles well. However, they have proven to be rather high maintenance and unreliable. Also, parts are hard to get and they are expensive.
The transmission is a GM 4L30E. This same transmission is used in BMW’s and Isuzu Troopers. I found some useful information in some of the Trooper forums.
The owner of this particular Catera found a replacement transmission on ebay. I had it delivered to my office parking lot. We swapped it on to my little utility trailer in the parking lot rather than having the truck negotiate the long gravel driveway to my shop.
With the car on the lift and the battery disconnected, I began by draining the fluid. Fluid is added through a hole in the side of the pan. There is no dipstick or filler tube like on other GM transmissions. I only drained the amount that comes out when the engine is off. The level in the pan is lower when the transmission pump is running. For this reason, the transmission fluid level must be checked with the engine running. Which is interesting considering the exhaust pipe runs just a couple of inches from the fill hole.
To release the torque converter from the pressure plate, I removed the rubber plug from the bottom of the bell housing. I used a long screwdriver to slowly rotate the flex plate until a bolt was visible through the front hole. An assistant with small fingers was helpful in removing the bolts through the access hole. There are six bolts that hold the torque converter to the flex plate. They all had 15mm heads.
**See update below on turning the crank by the damper pulley bolt instead.
I next disconnected the drive shaft at the coupling. I should have dropped the exhaust pipes at this point. It would have made removing the oil cooling lines much easier. Next I disconnected the electrical connectors and the oxygen sensors and removed the exhaust pipes. Be careful with the sealing rings at the front as they are very expensive from the GM dealer if you damage one. You can likely get them cheaper at a muffler shop but I was able to reuse the ones on this car.
Note: I was later able to find the sealing rings at Advance Auto but they are marked as discontinued by Fel Pro. They we still over $20 each which seems a lot for a simple gasket.
With the pipes out of the way, disconnect the shift linkage and anything else that might be connected. You may have to cut some wire ties on the wiring harness. Next, support the transmission on a jack and remove the cross member. The transmission mount was broken on this car so the cross member fell off when the bolts to the body were removed. The body bolts had locktite on them and were very difficult to remove.
Two of the main transmission bolts come in from the front of the engine and the rest come in from the transmission side. They all had 19mm heads. There are also four small bolts that hold the bottom of the bell housing.
I removed all the bolts and carefully slid the transmission back off the dowels and let the converter nose slip out of the crank. Then I lowered it out form under the car.
I set the two transmissions side by side on the floor and made sure everything was a match. All the sensors were in place on the replacement transmission so I did not have to move any over.
I then secured the transmission on the jack and set it level as that was how the engine was sitting. The sticker on the replacement transmission warned that the front seal needed to be replaced. I did not see any evidence of leakage but I pulled the torque converter any way to see how the seal looked. Sure enough, there was a visible worn spot on the seal.
The owner picked up one at Auto Zone that did not fit. He tried to get one form the Cadillac dealer but it was going to take two weeks. We found one on ebay but I decided to try one from Advance auto. That seal was made different but fit fine. The original seal has three bolts that hold it in place. The instructions say not to drive the seal in but to use the bolts to pull it down to a seat. The replacement seal from Advance did not have the three bolt holes so I had no choice but to drive it in. I did so carefully.
[Important Update! About three months later, the pump seal popped out of place. The transmission had to be removed from the car and a new seal fitted. This time I took the time to order the correct seal form a supplier on Ebay. This seal had the correct three retaining bolt tangs on it. It may be possible to fabricate some retaining clips for the Advance Auto seal, but I think it would be better to just use the correct seal. Note: do not use a seal without some means of mechanically fastening it in place!]
I had a lot of trouble getting the torque converter indexed back on the pump drive splines. I thought I had it once but when I went to set the transmission in place, it contacted the flex plate way too soon. I had to set it back down and try again. After much spinning of the torque converter, it finally dropped into place on the cogs and then there was plenty of room.
I made sure the transmission was lined up with the engine and carefully slid it into place. Everything slid into place easily. However I took my time and made sure that the bolts drew the transmission up evenly.
Ideally you would spin the torque converter a few times to make sure it is centered in the crank before bolting it to the flex plate. However, due to the design of the bell housing, all I could do was rock it back and forth a few times. I was glad I had pre aligned one of the tabs on the converter with a hole in the flex plate because it is very difficult to turn the torque converter through the tiny access hole.
I use a magnet and a small fingered assistant to work the bolts into place. Between bolts, I again used my long screwdriver to slowly rotate the flex plate to the next position. Once they were all in, I spun it all around one more time and torqued each one down tight.
Update: I found a 16 mm 12 point socket would fit the reverse torx crank bolt and allow me to rotate the engine form the front rather than awkwardly using the screwdriver on the starter ring.
Next I reconnected the wires and the shift linkage. I then reconnected the cooling lines being careful with copper washers on the rear banjo fitting. I fitted a new mount and reattached the cross member and exhaust hanger. There is a helpful arrow on the cross member to show which way is the front.
With all the bolts in place, I then reconnected the drive shaft. I had to use a soft hammer to get the shaft to slip over the output shaft of the transmission. I did not want to try to pull it down with the coupler. The local dealer wanted $220 for the coupler, so don’t damage it.
I set the left side exhaust pipe in place and reconnected the oxygen sensors. I then dropped the oil pan and installed a new filter and gasket. It was much easier to do this job under the car than with the transmission on the floor. I reinstalled the pan and filled it with fluid. I then put up the other exhaust pipe which limits access to the fill hole.
To fill the entire transmission, the pump must be turning. That means that the engine must be running.
Based on advice from a friend, I built a device to quickly put fluid in the transmission. I used a length of ½ inch clear tubing and a gallon transmission fluid jug. I drilled a ½ hole in the cap of the bottle and slipped the hose inside and down to the bottom. I used my heat gun to help straighten the hose. I then drilled a 3/8 hole near the handle of the jug. I put fluid in the jug and slipped the hose in the fill hole. I then used my air blow gun to pressurize the jug and force the fluid up into the transmission. A quart of fluid will transfer in seconds so be careful if you use this method.
Once the transmission was filled, I plugged the hole and lowered the car. I shifted it into all the gears and drove it forward and backwards. I could hear the pump whining so I knew it still needed more fluid. I picked it back up and filled it again. It seemed to stay full after having moved all the solenoids by selecting all the gears and moving the car.
I gave it a test drive and brought it back and checked for leaks. Finding none, I drove it back to the happy owner.
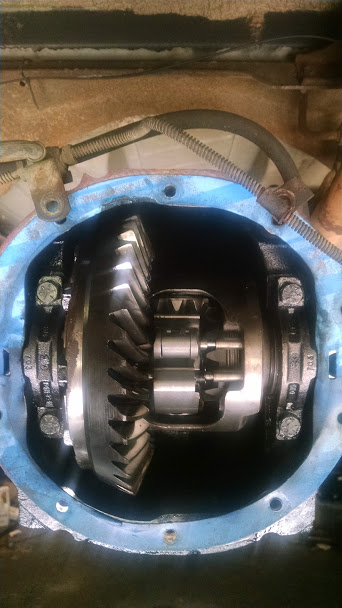
Dana 30 gears
I finally completed the regear of Jennifer’s XJ the weekend. This has been a much longer project than I first expected.
She has had a gear set on her shelf for a few months now waiting for me to install it. However, we had to collect all the various parts needed. The first being a matching set for the rear. Once the rear gears were in, I finally proceeded to work on the front.
I began by stripping down the old gears. This swap involved going from the stock 3.55 gears to 4.10 ratios. There is a different carrier required for the 4.10 gears due to the thickness of the ring gear.
The first step was to move the spider gears from the old carrier to the new one. The ring gear had to be removed to provide clearance for the cross pin to be removed. The cross shaft is held in place by a roll pin that has to be driven out with a punch. My proper sized punch seems to be missing, so I used an old drill bit instead.
With the spider gears transferred, I then mounted the new ring gear on the carrier. I removed the bearings from the old carrier to retrieve the shims being careful to keep them on the correct sides. I took a set of slightly worn bearings and reamed out the inner race with my die grinder until they slipped on easily. I used these for the trial fits before installing the new bearings.
I pressed off the old pinion bearing to retrieve the slinger under it. I then heated the new bearing and slipped it onto the new pinion with the slinger under it. I noticed after it cooled that I could rotate the slinger slightly so I tapped it down tighter with a punch and hammer.
I used a punch to drive out the races from the housing. There is an oil baffle under the inner pinion bearing that will be destroyed in the removal process. We had some trouble locating a new baffle. Although they cost less than two dollars, no one in town had one in stock. Most 4×4 places wanted $8 to $16 to ship one. We finally found a place with reasonable shipping and bought two just in case.
One of my XJlist members gave me the tip to measure the oil baffle and replace it with a shim during the set up process. This keeps you from destroying more of these baffles while performing the set up tests. My baffle measured exactly 0.020 inches so I used a 20 thousandths shim in place of it during set up.
The pinion depth on the Dana 30 adjusts by shims under the bearing race in the housing. This means driving the race in and out until you get the shims right. I took and old outer pinion bearing and reamed it out so it would easily slip on an off during set up. I assembled the pinion with bearings and slingers but no preload shims. I snugged up the yoke nut to take out all end play.
I then set the carrier in place. I used a soft hammer to drive it into the housing rather than using a case spreader. I set the caps in place and tightened them down. I then coated some of the teeth with the yellow marking compound that came in the overhaul kit. I then rotated the assembly around to get a pinion depth pattern.
I had used the chart in the Jeep FSM to select the pinion shims. Basically each pinion gear is marked with its variance from zero depth. In this case the old gear was marked 2 and the new gear was marked 6. This meant I needed to remove 4 thousandths of shim from the shim pack under the bearing race. I measured the shims that came out and removed a 10 and added a 5 to make up close to 4 difference. I then added a 20 to substitute for the baffle.
I almost cheered when this shim pack gave a beautiful wipe pattern showing the contact patch right in the middle of the gear. I also found that the yellow gear marking compound which is actually made by GM makes a much better mark that the Prussian Blue I have used in the past.
I set up my dial indicator and verified the back lash. It was a bit hard to read the indicator but it was well within the .006 to .009 spec in the manual. That meant the same shims from under the old bearings would work.
I almost wished I had put the baffle in. I carefully drove out the race and replaced the shim with the baffle and reinstalled it.
I prepared to set the pinion preload with the new bearings. That is when I noticed that the rebuild kit contained the wrong outer pinion bearing. It was one for a low pinion Dana 30 rather than the XJ style high pinion. This difference has plagued this install from the beginning. (See the earlier posts.) I obtained a replacement from Advance Auto but not without some difficulty getting the right part even with the old bearing in hand.
I prepared a set of shims based on what had come off the old pinion. These proved to be way too tight. I then built a thicker stack of shims. These were too loose. The pinion preload is supposed to be between 20 and 40 inch pounds when installing new bearings. The preload is adjusted with shims on the XJ contrary to what the FSM says. Some Dana 30s use a crush sleeve like the Dana 35 but not this axle.
I then made up a shim pack that measured 55 thousandths. This was too tight, so I made one that measured 60 thousandths. This was just a bit too loose. Luckily, I do have an inch pound torque wrench so I could make accurate measurements. I would have been very frustrated if I were trying to use weights and a string as some forums recommend.
I came down to where 55 was too tight and 59 was too loose. I was not able to build a pack in between with the shims I had. I finally gave up a made it just a bit loose. I hammered in a new seal and made the final install of the yoke. I had upgraded her to the U bolt style yoke from the strap style while we were in there.
I then replaced the set up bearings on the carrier with new ones from the rebuild kit. I once again used my soft hammer to tap the carrier into the housing and torqued the cap bolts to spec. I rechecked the backlash and pinion wipe pattern with the new bearings. Nothing changed.
With everything in place, I left her put the new gasket on the newly pink diff cover. She bolted it up and filled the housing with oil. She then put up her drive shaft and skid plate.
A test drive indicated that the new gears ran nice and quiet. We then took it for a quick run in the woods and enjoyed the new crawl ratio.
[phpbay]dana 30 4.10, 10[/phpbay]