
How to change the transmission fluid and filter in a Jeep Cherokee automatic AW4
The Jeep service manual recommends changing the fluid every 25,000 miles. I rarely see XJs get serviced that often.
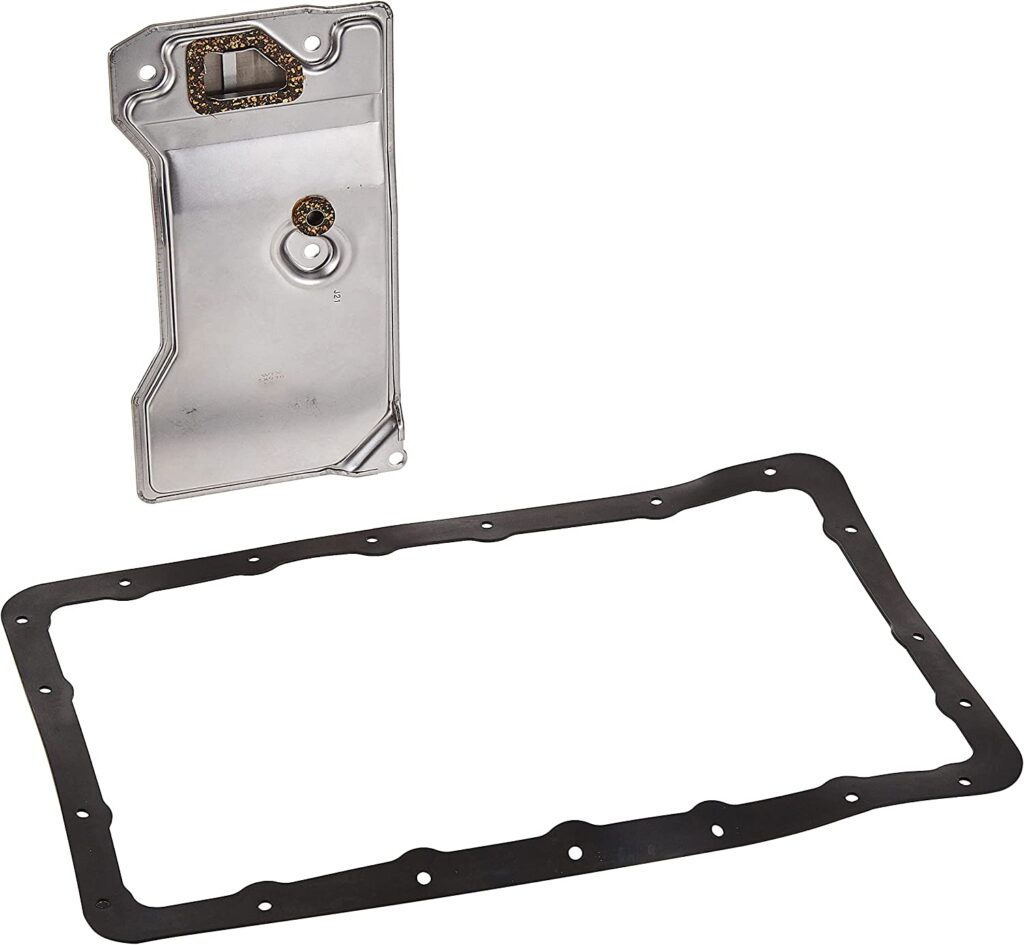
Changing the fluid and filter requires removing the transmission pan. A handy drain plug on the AW4 allows for fluid draining. Odly for the XJ, it uses a 14 mm wrench to remove it. But, I recommend changing the filter as well.
But before you start, I recommend removing the bolt that holds the filler tube to the engine block. it has a 13mm head and is hard to get to. I used a long extension and a swivel joint.
Now raise the Jeep and support the transfer case. Remove the cross member by removing the four transmission mount nuts (13mm) hidden inside the cross member. Then remove the four bolts (15mm) holding the cross-member to the body.
Remove the plug and drain as much fluid as possible. It will be about a gallon to five quarts so make sure you have a large enough pan.
Next, remove the perimeter bolts (10mm). level a couple in the front partially threaded in to allow the pan to tip back and fully drain.
Now, you need to try to separate the two parts of the filler tube. If these have been together a long time like most XJ that do not get serviced every 25000 miles, this joint will not come apart. To remove the pan with the filler tube still attached, and remove all the pan bolts. Then, working from the engine bay, work the hold-down tab over the bell housing. Now, lower the transmission slightly to make some space between the body and the transmission. You should be able to work the pan out now with the filler tube attached.
It is not necessary to separate the filler tube, but it will be easier to reinstall if you do.
Now remove the for bolts (10mm) holding the filter to the valve body, Remove the filter making sure both gaskets come off with the filter.
Inspect the solenoid wiring and make sure the mating surface is clean. Install the new filter and tighten up the four bolts,
Now, clean the inside of the pan and inspect the magnets for debris. The more fuzzy metal there is the more wear the clutches have. Install the gasket by pressing a few mounting bolts through the gasket to get it lined up.
Note the pan is glued on at the factory. If the pan did not have a gasket, take time to carefully clean both mating surfaces. You can use a sealant instead of a gasket but I like the one that comes in the WIX kit.
Carefully line up the bolts and start them by hand once you get some close to the corners the gasket and pan should line up. If you still have the full filler tube attached to the pan, make sure the mounting tab is in the proper place in the front of the bell housing before starting any bolts.
I don’t think I have ever serviced an AW4 transmission pan that did not have at least one stripped bolt. So have a Helicoil kit ready. (6mm x 1.0) You can do a tread repair with the pan in place so go ahead and put in all the good ones and do the thread repair on the bad ones.
Once the on is in place, install the top part of the filler tube. I find it easiest to drop the tube from the top and then align it from underneath. Then I use a rubber hammer to tap in down into place. Reinstall the mounting bolt on the bell housing.
Now, raise the transmission back up into position and reinstall the cross member. Usually, the transmission will shift a little to one side as it is raised and lowered so be prepared to pry a bit to realign the cross-member bolts. I find it easiest to mount the cross member to the transmission mount while it is slightly lowered and then jack up the cross member to the body.
Refill the transmission with fresh fluid. It will take about 5 quarts. I like to put in four and then run the engine, cycle through the gears, and check for leaks. Then, check to see how much more fluid to add.
Fresh fluid and filter should help keep your AWW4 happy for a long time. These are very durable transmissions as lo gas they are not severely over heated or run low on fluid.
Please note that some of the links in this article may be Amazon affiliate links, which means I may earn a small commission if you click through and make a purchase. This commission comes at no additional cost to you, and it helps me to continue to provide helpful content. Thank you for your support!