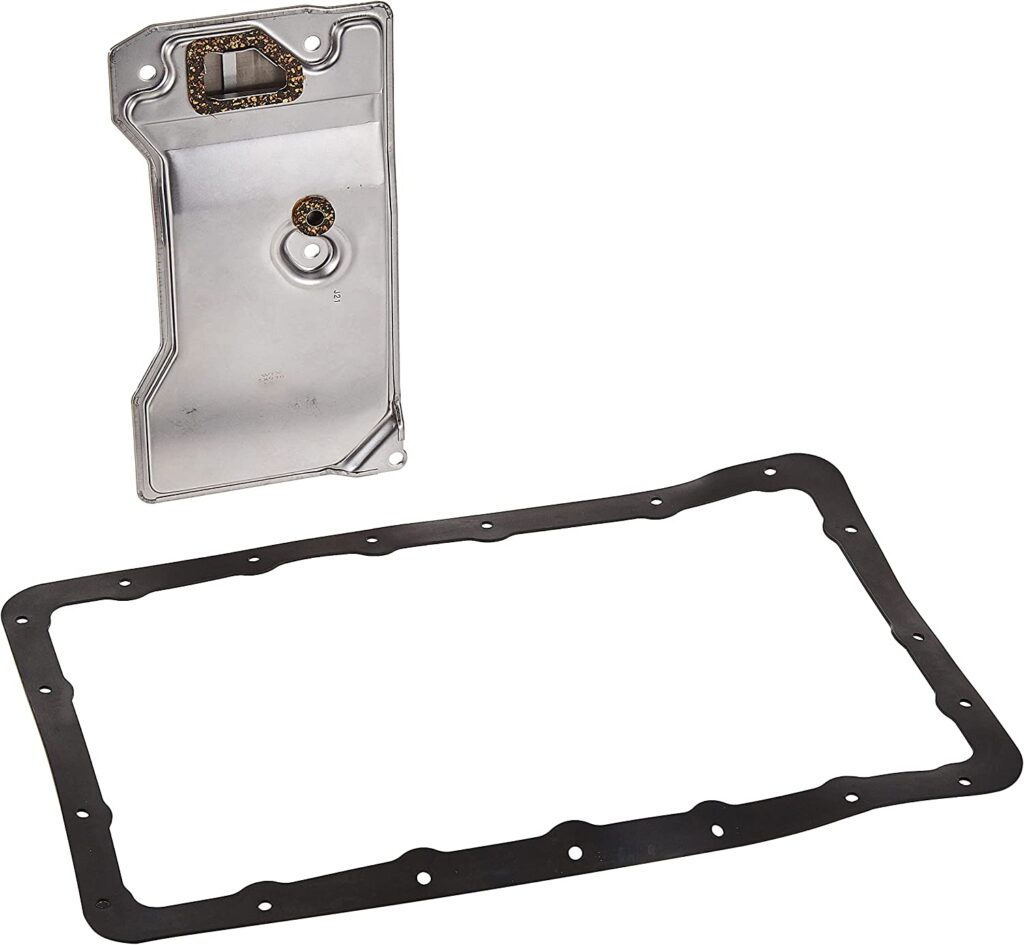
How to change the transmission fluid and filter in a Jeep Cherokee automatic AW4
The Jeep service manual recommends changing the fluid every 25,000 miles. I rarely see XJs get serviced that often.
Changing the fluid and filter requires removing the transmission pan. A handy drain plug on the AW4 allows for fluid draining. Odly for the XJ, it uses a 14 mm wrench to remove it. But, I recommend changing the filter as well.
How to replace windshield wiper bushings on a Jeep Cherokee
After a while, the windshield wipers on a Jeep Cherokee will develop slack and begin to hit the windshield trim. The Jeep dealer will tell you that you have to replace the entire wiper mechanism. However, the wear is just in the little plastic bushings. With a little know how and some simple hand tools, you can have your wipers working properly again for just a few dollars in bushings.
The bushings you need are available from most auto parts stores who carry the HELP brand. You have to buy a whole pack of wiper bushings to get the three you need.
Begin by removing the wiper arms. There is a small tab near the base of the arm. Pull out on the tab and you can then remove the wiper arm from the splined drive.
Next, remove the several Phillips head screws that hold the cowl cover to the Jeep. Carefully lift the cover up until you can reach the windshield washer hoses. Pull both of these off and then set the cowl cover aside.
Remove the four torx head bolts that hold the wiper mechanism to the Jeep. These are T30 torx. Then, remove the bolt that holds the drive motor to the Jeep. It has a 13mm head. Disconnect the wiring harness from the drive motor.
Drop the splined parts through the cowl and then work the whole assembly away from the center of the Jeep into the cavity in the fender. Rotate the mechanism so that you can lift it up and out of the access hole.
Locate the three plastic bushings in the linkage. Check them for slop. On mine, only the one at the drive motor was worn excessively. Mark the linkage so that you can put it back the way it was. Use a pry bar to separate the bushing from the pivot ball. Place the bushing over a receiving cup. I used a large socket. Tap it with a hammer to remove it from the linkage. Flip the link over and drive in the new bushing in a similar manner. Make sure the tabs are aligned with the slots in the link.
If the pivot balls are rusty, clean them before reassembly. I also added a dab of grease, but that is not required. Press the ball into the bushing. Repeat the process for the other two bushings as needed.
Slip the mechanism into the cavity in the fender and rotate it back into position. Start the drive motor bolt, but do not tighten it. Make sure that the wires and washer hoses are not trapped below the linkage. Install the four torx bolts that hold the mechanism to the cowl. Once all four are started, tighten them all down. Then, complete tightening down the drive motor bolt.
Reconnect the wiring harness. Connect the two washer hoses to the cowl cover. Replace the cowl cover and screws. Slip the wiper arms back onto the splined drives and set the clips.
Spray some water on the windshield and test the wiper operation. Make sure the travel is correct and that there is no binding. If the wipers do not park in the proper position, remove them from the spines and reset them to the correct position.
The bumper on my off Road Jeep is very simple. It consists of a couple of pieces of angle that extend the unibody frame rails out. The winch plate is mounted on top of them. There are a couple of pieces of curved pipe extending to each side to protect the bottom of the head light surround.
Since Jenny drives her Jeep everywhere she goes, she wanted something that was both functional and nice looking. Had I been fabricating form scratch, I would have used a piece of 2×6 tubing and tapered the ends to make a nice looking bumper. However, the cost of a stick of steel was out of budget for the moment.
What I had to work with was a damaged bumper on a parts Jeep sitting in the grass by the barn. It was made from heavy steel it was just not exactly the shape I wanted. It also had a brush guard and winch plate integrated into the design. Jenny did not want the brush guard and does not have a winch.
I began by removing the bumper from the parts XJ. There was an extra bolt that simply would not come loose. I had to cut it with a torch to get it out.
I began by cutting off the brush guard and its mounting brackets. Next I cut out the winch plate. This left a big gaping hole in the center of the bumper. I cut a couple pieces of angle and used those to fill in the gap.
I did not like the way the bumper stuck out from the front of the Jeep, so I relocated the mounting holes to pull it in closer to the grill. I would have liked to have tapered the ends but that would have meant extensive reworking of the bumper. By setting it back, the tips don’t really stick out too far.
I painted the bumper flat black to mask some of the weld marks and to match her rear bumper. I trimmed the ends of her rear bumper to be similar to the cut of the front bumper.
I removed her twisted stock bumper and the stock air dam.
Mounting the bumper to her Jeep Cherokee, required trimming the front fenders since part of the bumper extends back under the grill. I used a straight edge and a sharpie to make a mark on the fender. I used a cut off wheel in my grinder to make the cut. I touched up the raw edge with spray paint.
I tied the vacuum bottle to one of the fender supports with wire for now. I will move it inside the engine compartment later as the cut of the bumper leaves it venerable to breakage where it is.
The new bumper gives her Jeep a muck more aggressive look. It also improves her approach angle for off road obstacles compared to the stock bumper.
Janice’s Jeep was making a roaring noise from the rear end. After just a short test drive, the pinion on her Dana 35 was much warmer than the rest of the axle. Listening with a stethoscope confirmed that the pinion bearing was noisy.
I tried just changing the outer bearing and seal but since the race was worn was well, I had to disassemble the differential and change both the pinion bearings.
I ordered a Pinion bearing kit from Crown Automotive. This kit came with bearings, a new crush sleeve, shims and a reusable gasket.
I removed the wheels, and brake drums. Then I removed the cover and drained the fluid. Next I removed the carrier. I was careful to keep the bearing races and shims in the proper order. I noticed that the bearing caps were marked with and X to keep them on the correct sides. One X was vertical and one was on its side.
I dropped the drive shaft and removed the pinion nut. I used a dead blow hammer to knock the pinion out of the front bearing. I then used a pry bar to remove the pinion seal.
I used a chisel to tap out the two bearing races. I used a soft punch to drive the in the new bearing races. I used a bearing separator and hydraulic press to remove the inner bearing from the pinion. I ended up breaking the bearing race while pulling it off, so I was glad I was not trying to reuse it. I reused the shim under the bearing. I used my heat gun to warm the bearing and then slipped it onto the pinion shaft.
I installed the new crush sleeve on the pinion as well. Next, I cooled the pinion in the freezer for a while before slipping it in to the housing and placing a warmed outer bearing on the shaft.
I installed the seal and yoke and then tightened the pinion nut until the preload on the bearing was about 15 inch pounds. To check the preload, I had to use several adapters to get from the ¼ inch drive of my torque wrench to the ½ inch drive of the socket.
With the preload set, I reinstalled the carrier. I used a dead blow hammer to tap the bearings into place. I reinstalled the caps making sure they were turned the right way round and they were on the correct sides.
I slipper the axle shafts back in place and re secured the C clips. I then reinstalled the center pin set screw.
I put the cover back in place using the reusable gasket from the kit. I put some silicone on the cover to glue the gasket to it and cleaned the housing well. I put the bolts back in and tightened them evenly. I filled the housing with gear oil and the Limited Slip friction modifier compound.
I reinstalled the brake drums and wheels before taking it for a test drive. It was much quieter and the pinion did not heat up as before.
The pinion bearings are also available from Advance Auto:
My old exhaust was crumbling apart. The tip had fallen off behind the holder and the muffler had a huge crack in the bottom. It rattled and rumbled.
Old Rusty exhaust
I ordered the Dynomax system from Summit Racing through their Ebay store. It arrived in just a couple of days after I ordered. I had to laugh at the UPS man struggling with the huge box coming in my office door.
Smash checking out the package
I began by lifting my Jeep and using a reciprocating saw to cut the muffler loose from the catalytic converter. There were a lot of old welds here so it was pretty messy. I cut the muffler to get room to work to clean it up.
Cutting off the old
The clamp at the rear hanger broke when I tried to unbolt it. I just twisted it out of the way. With both ends loose I was able to remove the muffler and tail pie as a unit from over the axle.
Old Exhaust out of the way
I used a variety of metal working tools to clean up the end of the cat. I cut off the bulk of the old pipes and weld beads with a torch. Then I used a 7 inch grinder to clean up the slag. I finished with my 4 ½ inch grinder fitted with a flap disk.
Old welds gone
When I finished the reducer include in the kit slipped smoothly and snugly into place on the cat. There was a small hole in the pipe coming out of the cat so I elected to weld this joint closed rather than use the included clamp.
Reducer in place
Next I slipped the muffler into place. I supported it on a stand while I fit up the tail pipe. It took some wiggling to get the tip to line up where I wanted it between the spring and the trailer hitch. When I finally got it in place I used a ratchet strap to hold it in position while I put a tack weld between the muffler and the tail pipe.
Muffler in place - Jeep Cherokee
Tail pipe in position
To get the rubber donut to connect properly with the hanger welded to the tail pipe, I removed the two bots that hold the hanger to the body. Then I slipped the donut over the hanger on the pipe and then I reattached the hanger using the bolts. This seemed easier than wrestling with the heavy rubber, which was cold and inflexible.
Rubber doughnut hanger
I then tightened the clamp on the rear hanger making sure the pipe was still positioned where I wanted it. I then installed the clamps at each end of the muffler. I rotated them so that the base of the clamp would face to the side. This gives maximum ground clearance and protects the ends of the bolts from damage.
Muffler clamped in palce - Jeep Cherokee
With all the clamps in place, I removed the support and gave it a good shake to make sure it was positioned where I wanted it. I then lowed the Jeep and started the engine. I raised it back up and checked for leaks. Finding none, I was ready for a test drive.
Cat back system complete - Jeep Cherokee
The Dynomax system has a nice throaty rumble without being loud. I am very happy to have my exhaust gasses exiting from behind the Jeep again instead of from underneath.

 HELP Wiper bushing kit


