Exhaust Leak

My friend Ed took his one ton van in for an emissions inspection and they would not test it because there was not enough exhaust gas coming out the pipe for them to test. They rolled their mirror around and verified that he had a catalytic converter in place but they refused to inspect him due to the lack of exhaust flow.

It took a few days for us to get together for me to look at it but I finally got time to travel to his place and take a look. I tossed my pit mat down in the dirt beside the van and crawled under to take a quick look.

What I found was a one inch gap between the pipe out of the cat and the muffler. It had rusted completely in two. How they did not spot this with the inspection mirror is a mystery and makes me wonder just what they are inspecting for.

Exhaust Leak

I let him know that I could make a temporary patch there and he could bring it to my shop later for a more permanent repair.

We went to Autozone and bought a 3″ pipe coupler and the one clamp they had that fit. My plan was to slip the coupler over the gap and clamp it down.

I had quite a time getting the old rusty clamp off. I soaked it in WD40 and used a brush to clean the threads. I then worked the rusty nuts back and forth to finally get them off without breaking the clamp. I had to put my jack under the clamp to hold it to keep from bending the pipe as I put torque on the nut.

Once the clamp was off, I noticed that this was a slip connection and that the rear pipe was going to be the same size as the coupling I had just bought. I used Ed’s hacksaw to make several slots in one half of the coupling and used the tongue of his trailer for an anvil to flare it out so it would slip over the rear pipe.

I slipped the coupler over the front pipe and then worked it back over the rear section. I centered it the best I could and installed the new clamp on one side and reused the rusty clamp on the other.

I had him start it up and I checked for leaks. There were some small leaks at the end of each cut but nothing serious. I think I should flow enough gas for him to get his emissions inspection now.

Lula Lake and Lula Falls

Lula Lake and Falls

Lula Lake is located on Lookout Mountain near the Tennessee Georgia border. Old postcards indicate that this beautiful lake and water fall have been a popular tourist destination for decades.

There is a old rail road grade that makes the main trial through the property. This railroad was apparently used to log off the area in years past. The delicate environment of the brow was ravished by the logging operations so the land was sold cheap over the years.

Now the Lula Lake Land Trust has taken over the area to preserve the rich natural beauty of the area. They open the area to the public only two days per month to preserve it.

The narrow road in is slightly rugged and we were glad we were in our 4wd Suburban and wished for our Jeep in a few spots. However, we never actually had to engage 4wd, it was just nice to know it was there.

At the bottom of the hill is a large grassy parking lot. There was a blue tent set up and we were greeted by a friendly person with maps of the park and he was happy to answer any question we might have. He suggested a couple of different paths we might take around the maze of trails.

We chose to walk down the gravel road on the old rail road grade as we wanted to see the lake and water falls. We left the road about halfway there to take a trial that paralleled the road on the other side of the creek. This involved crossing Rock Creek but there were plenty of stepping stones to make it a dry crossing. The children with us used this time to cool off and play in the water.

This trail was actually an old road as well. I sure wish I could explore the area in my Jeep. The creek crossing would have been really fun in the Jeep. Unfortunately they do not allow motorized vehicles on the trials. They do allow bicycles however and the park is dog friendly.

We hiked thought the woods until we intersected the creek again. Here the gravel road has a nice new bridge to cross the creek at the top of the first falls. This is really a cascade into Lula Lake. The rail road grade made a huge cut through the rock at this point so there are steep rock walls on either side of the road after it cross the bridge.

The Trust has added picnic tables and grills to a wide spot they have created overlooking the lake. The lake was much smaller than I expected form the pictures. It is very pretty however with eh falls cascading down into the still pool. I have heard estimates of the depth form 20 to 40 feet. I have heard stories of it being a popular place for scuba diving in years past but swimming or even wading is prohibited now.

Continuing down the path for a few hundred more yards we found the over look to the main falls. This is a huge water fall that drops over an under cut rock. There is a large cave or rock shelter under the falls.

The trail down to the base of the falls is steep and treacherous. There are some cross ties set in the dirt but they seem to be more for erosion control that for steps. Expect a difficult climb down the steep hill to access the bottom of the falls.

The climb is well worth the effort however. At the bottom the trail opens up into the rocky creek bottom.

When we visited it started to rain just as I made it to the bottom. As I hurried across the exposed rocks to the shelter of the overhang, I slipped on one of the polished slabs of rock. The rocks are very slick when wet. I finally made it under the over hang and we waited out the storm with a dozen or so other visitors. There is a large cave that I did not explore as it was filled with more slick rocks and debris that had washed in from the creek.

We enjoyed the view of the back side of the falls while we waited out the storm. The children with us enjoyed playing on the rocks and in the water.

The climb back up the hill is really tough. I had to lift the smallest child that was with us as the steps were too high for him to negotiate. We were all pretty worn out by the time we made it back to the gravel road.

We elected to save the bluff trail and other side trips for another visit. We hiked the gravel road back to the parking area and were happy to be back in our trusty Suburban.

The road out has one steep climb that some cars seemed to be having trouble with. However the climb is paved and our truck had no trouble at all.

I look forward to returning and hiking more of the trails to see more of what the park has to offer. The limited opening schedule may prevent me from going back right away however.

For more info about the area and to see the opening schedule see http://www.lulalake.org
Ford Road
Lula Falls
Lula Falls

How to Replace the Front Motor Mount on a Mercury Villager

How to Replace the Front Motor Mount on a Mercury Villager

Motor mount failures seem to be a common problem for Mercury Villager vans. The same vehicle is also sold as the Nissan Quest.

The front mount is the most common one to fail. This mount takes most of the load when starting off from a stop. Repeated failures have been reported by some. Make sure you buy a replacement part that is form a quality manufacturer and has a lifetime warranty.

Raise the vehicle and support it safely. Remove the plastic splash guard by removing the fasteners that have 10mm heads. They also have Phillips screwdriver slots but will likely be too tight to easily remove with a screw driver.

Remove the oil filter. Support the engine using a jack under the oil pan. Raise it to the approximate position it will be in once the new mount is in place. It will likely have dropped down some if the front mount has failed.

Remove the two bolts that hold the mount to the cradle under the engine. Next, remove the bolt that goes through the center of the motor mount. Keep track of where each of the bolts came from. They all have 17mm heads but are different lengths.

Tilt the mount forward and then twist it out. If it will not tilt forward, raise the engine a bit more to make room. You may have to unclip the wiring harness that is fastened to the cross member to make room, but I was able to get it out with it in place.

Pull the mount out through the opening created by removing the oil filter. Insert the new mount through the same opening and tilt it back in to place.

Replace the center bolt through the bushing first. Put the nut on but do not tighten it all the way. Align the other two holes by raising or lowering the engine on the jack. Replace the two bolts through the cradle and tighten them down. Now finish tightening the center bolt in the bushing.

Clean the mounting surface of the oil filter and replace the oil filter. Replace the plastic cover. Lower the van and test it out. Check for leaks at the oil filter.
[phpbay]mercury villager nissan quest, 10[/phpbay]

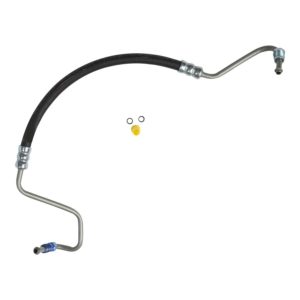
How to change a Power Steering Hose on a Jeep Cherokee

power steering hose

My son’s Jeep was leaving oil stains in the driveway and making a howling noise when he turned the steering wheel. I popped the hood and had him turn the wheel. Sure enough, fluid was seeping through the hose when it was under pressure. There did not seem to be a definite hole, the rubber had just become porous with age.

Before I began, I coated my hands with Market America Clear Shield to protect me form the power steering fluid.

I began by obtaining a replacement hose. I could have had a new section of hose put on the old fittings at a hydraulic shop. However, it looked like one of the metal ends was kinked by a previous owner so I elected to replace the entire assembly. I bought one from a chain auto parts store so that he could easily swap it out if there was a warranty issue.

Since the hose had been leaking for a while, the area was very oily. I coated my hands in Market America Clear Shield to prevent oil stains on my skin.

First I removed the air filter box since the steering box is located below it. Next, using a 5/8 inch wrench (because I don’t own a full length 16MM open end,) I loosened the fitting at the pump.

The fitting at the steering box is 18 MM. It is very difficult to get to even with the air box out. Before removing it, make sure you remember how the hose is routed. Take a picture or make a drawing to make sure it goes back the right way. It may look like you have to remove the return line to remove the pressure line but you don’t. There is enough room to pull it out if you twist it correctly.

Next I installed new O rings on the new line. I was careful not to nick them as I used my fingers to slip them in place.

I installed the steering box end first but left it slightly loose so I could rotate the hose to the proper position to make the pump connection line up. I was very careful to not cross thread the lines when screwing them in place.

Next I installed the pump fitting. I held the line in the proper relationship as I made the final turn on the nut. I could feel the O ring seat. Then, I turned the box end the last turn and locked it down in place as well.

I filled the reservoir with the correct fluid. I then started the engine and turned the wheels from lock to lock a few times until I heard all the air purge out of the system. I then checked for leaks at the fittings and the crimps on the new hose.

I reinstalled the air box and replaced the various vacuum lines that had been knocked loose by moving the air box around. I am glad I caught it before the pump was damaged from running it low on fluid.

Beck Arnley Power Steering Pressure Hose

[phpbay]jeep power steering, 10[/phpbay]