How to replace the track bar on a Jeep Cherokee

How to Change the track bar on a Jeep Cherokee

The track bar locates the front axle side to side on a Jeep Cherokee. The stock bar consists of a rubber bushing at the axle end and a tie rod end at the frame joint. The frame end joint generally wears out first.

To determine if the track bar is bad, hold your hand on the frame end joint while an assistant turns the steering wheel back and forth. Any movement here means the bar is bad.

To replace the bar begin with the vehicle weight still on the axle. Locate the steering so that the 15mm head bolt that fastens the track bar to the axle is accessible. Remove the bolt. There is a special nut with a tab on it behind the axle. Pull it out after the bolt is free.

Now lift the vehicle to a comfortable working height. Remove the cotter key from the mounting bolt. Use a ¾ inch box end wrench to loosen the nut. Do not remove it completely at this time. Run it up even with the top of the bolt.

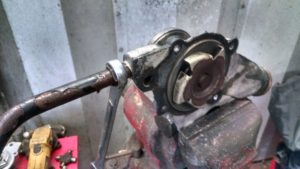
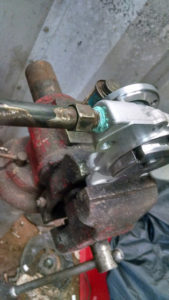
Use a tie rod end removal tool to press the tapered link out of the frame mount. My favorite is the pesto tie rod puller from JC Whitney    ( Since that tool is no longer available try this one from Amazon) that accesses the joint from the side. Hammer the puller between the bar and the mount. This will likely damage the rubber boot. Put a moderate amount of pressure on the puller by tightening the bolt on the puller.

Then use a hammer to hit the frame bracket. Hit it hard. The idea is to temporarily deform the tapered hole enough to loosen its grip on the pin. When the bar pops loose, the puller will likely fall so watch your toes.

Remove the nut the rest of the way and remove the bar. Clean the tapered hole.

On the new bar, note the location of the cotter pin hole. Be sure it is rotated in a way that will allow you to put in a new pin once it is installed in the cavity.

Slip the tapered pin into the hole. Tighten the nut. Align one of the castle nut opening s with the hole in the pin. Insert a new cotter key and bend it back over the top of the pin.

Lower the Jeep to put weight back on the axle. Fit the axle end of the bar in the bracket and align the hole. The easiest way to align the hole is to have an assistant turn the steering wheel while you line up the bolt with the hole. Alternately you can push or pull the Jeep side to side to line up the holes.

Slip the bolt in and hold the special nut up behind it and carefully start the threads. Run the bolt in but do not tighten it fully. Bounce the Jeep a few times to settle the bushing in place. Then tighten the bolt.

Grease the frame end joint if it is fitted with a grease fitting.


Tie rod removal tool

Jeep 4.0 Oil filter adapter leak

Jeep 4.0 Oil filter adapter leak

Jeep Cherokees and other Jeeps that use the 4.0 are subject to a leak on the side of the block where the oil filter adapter attaches. There are three O rings inside that with age will leak.

Often this leak is misdiagnosed as a rear main leak or even a valve cover gasket leak. When the oil filter adapter leaks oil is blown back and collects on the rear of the engine.

The proper O rings are available in a kit from your local Jeep dealer or form a Crown Automotive distributor. Standard O rings do not seem to fit, so you need to get the proper rings from the kit.

There are two different types of oil filter adapters used throughout the run of 4.0 blocks. One has a 5/8 hex on the surface. The later version has a T60 torx in the end.

Removal of the older hex version is pretty straightforward. Just turn the hex with a wrench and remove the adapter.

Removal of the later Torx version is more difficult in that there is not enough room to put a normal torx bit in the opening and still be able to put a racket on it. One method to gain clearance is to remove one of the bolts that hold the engine mount to the body. Getting this bolt head out of he way will give just enough clearance to put a 3/8 ratchet or breaker bar on the torx bit. As the center unscrews, you will run out of room before the part is all the way out.

One way to deal with the lack of clearance is to use a torx bit that can be fit in a box end wrench. Or you can make a special tool for the job by welding the torx bit into a box end wrench.

When the O rings are hardened, it takes a lot of torque to break it loose initially and there is a lot of friction all the way out until it comes loose. If you make a wrench, be sure to make it strong.

Once the adapter is off the block, you will need to remove the old O rings. If it was leaking, then they will likely be hard like bakelite. The big one often sticks to the bock. Scrape it loose or free it from the O ring groove depending on where it ends up.

The two on the center bolt are best removed using a dental pick. Coat the new ones in oil to slip them in place. Make sure they are seated in their grooves and not twisted when in place.

Set the adapter back up on the block. Align the roll pin with the groove in the adapter to ensure the proper clocking of the adapter.

Carefully start the center bolt into the bock and tighten securely. It does not have to be as tight as it was when it came off. It was stuck by the old O rings then.

Check the oil level, as you will likely have lost what was in the filter. Start the engine and check for leaks.

T60 bit can be turned with a wrench   https://amzn.to/2rrE454

How to Replace the Water Pump in a Jeep Cherokee

A leaking water pump can quickly damage the otherwise very reliable Jeep Cherokee Engine. The water pump can be changed by a home mechanic with some patience and ordinary hand tools.

When the Jeep Cherokee water pump seal fails, it will leak from the weep hole in the bottom of the pump. Since this hole is behind the pulley, it is often hard to see where the fluid is coming from. Often a water pump leak will be misdiagnosed as a leaking hose as the fluid runs down and drips off the bottom of the hose.

Begin by letting the Jeep cool. Remove the radiator cap and make sure there is no pressure in the system.

Remove the electric fan. It unbolts from the header at the top and the bottom sits in two tabs at the bottom of the radiator.

Place a pan under the Jeep to catch the anti freeze and remove the lower radiator hose. Let the system drain. Next, remove the heater hose from the tube attached to the water pump. Be careful with the tube as you will have to reuse it.

Break loose the four bolts that hold the pulley to the water pump but do not remove them. If the tension on the belt does not hold the pulley from turning, use a square section screwdriver between two bolts to hold it while breaking loose each bolt.

Remove the tension of the belt at the power steering pump. On the earlier versions, the whole power steering pump moves. On later ones, there is a separate adjuster pulley. Move the belt out of the way.

Finish removing the bolts and remove the pulley. Now you can access the four pump mounting bolts. These have half inch heads, not 13mm and one bolt is longer than the others.

Remove the two bolts that hold the power steering pump bracket. These are 15mm on some and 9/16 on others.

Now pry the pump away from the block. If this is an original water pump, there will be a pry tab on the top of the pump by the metal pipe. Many aftermarket pumps do not have this pry tab.

Twist the pump out from under the power steering pump bracket and carefully remove it from the Jeep. Place the pump in a vise and remove the metal pipe noting its orientation.

Put some thread sealer on the threads and install the pipe in the new water pump. Turn it until it is aligned the same as the old one was. It should stick straight back from the impeller.

Use some sticky gasket sealer like permatex to hold the gasket on the water pump.

Clean the front surface of the block down to bare metal. This is probably the most time consuming part of the whole job. Use a scraper and some chemical gasket remover if needed. The block is cast iron, so you can be aggressive when scraping.

Twist the new pump into place under the power steering pump bracket and seat it into place. one of the bolts goes into the water jacket so just to be safe I like to put pipe dope on all the bolts to seal them.  Install the four mounting bolts that secure it to the block. Tighten them evenly.

Install the two bolts that hold the pump to the power steering bracket. Install the pulley using a screwdriver to hold the bolts while you tighten them. Make sure the pulley seats squarely on the flange and does not wobble when you spin it round.

Install the belt and set it to the proper tension. Reinstall the lower radiator hose and tighten the clamp. Leave the upper hose off for the moment.

Fill the system with a mixture of antifreeze and water appropriate for your climate. I use 50/50. Fill until the fluid comes out the heater hose or the metal line. Reinstall the hose and continue to fill the system. Most Jeeps hold about two gallons when the water pump is removed.

Check for leaks and then install the electric fan. Tilt it into place and engage the lower tabs. Then install the two bots at the top. Connect the control wire.

Start the engine and check the belt tension and check for leaks. Recheck the coolant level after the engine has been heat cycled.

Installing a Slip Yoke Eliminator (SYE) in a Jeep Cherokee

Installing a Slip Yoke Eliminator (SYE) in a Jeep Cherokee

This weekend I installed in Jenny’s Jeep Cherokee the SYE equipped 231 that I built last fall. Our plan was to use a stock front drive shaft in the rear and to remove the transfer case lowering blocks that had to be used to align the drive shaft previously.

Before I began, I coated my hands with Market America Clear shield.

I began by removing the original transfer case. As described in a previous article I installed the SYE in a spare 231 case. The Slip Yoke Eliminator kit can be installed with the transfer case still in place under Jeep.

I began by draining the fluid from the transfer case. Then I removed the rear drive shaft and disconnecting the front shaft from the T case. To remove the transfer case, I supported the transmission and dropped the cross member. I also disconnected the exhaust that the cat flange to get a little more working room.

Next I used a 9/16 box end wrench to remove four of the six bolts that hold the transfer case to the transmission. I used a socket and long extension to get to the two behind the linkage bracket.

With the old transfer case out of the way, I put the modified case up. I had an assistant turn the output shaft to align the splines while I pushed the case into place. Then I tightened the six nuts that hold the case in place.

I lifted the transmission back into place and reinstalled the cross member. Next I reconnected the exhaust and the shift linkage. Then I filled the case with fluid.

The trouble began when I went to hook up the rear drive shaft. The shaft that I had pulled for this purpose would not reach. It was simply not long enough. It also had trouble sliding on the slip joint. So, I rummaged around the barn and found another front shaft. This one slipped in and out easily and reached just fine.

We bolted up the front shaft and took it for a short test run. A very short test run. As soon as we backed it out of the barn, it was obvious that the advice we had read in an internet forum about what shims to use was completely wrong. The drive shaft angle was completely wrong.

I made a few measurements and found we needed 7 degree shims. A call to our local 4wd shop revealed they did not stock them. We chased a few leads they gave us only to find dead ends. As we were ready to give up for the day and possibly the weekend, Jenny used her new Droid phone to research and found Summit racing, 142 miles away, had them. She called and found they had six and eight degree shims in stock but no sevens.

I expected our trip to Golden Mountain was postponed again, but she jumped in my truck and was waiting for them to open the next morning and had shims back at the shop by noon. Determined to go off roading this one is.

I unbolted the spring pack and installed the six degree shims. With it all back together and better aligned, we took it for another test drive. Much better, but there was still a nasty vibration.

Back in the shop I found that the shaft I had grabbed had a lot of play in the double cardon part. So we swapped her front shaft to the rear and made a test run. This time it was vibe free.

I hammered the other shaft apart and greased the splines to get it to slide. Once it was flexible enough I installed it in the front. A quick test run showed some noise but the vibes were at an acceptable level.

Monday we packed up and drove 111 miles to Golden Mountain Off Road Park in Sparta, TN. She had no problem going seventy miles per hour on the interstate following me with my rig on the trailer.

The SYE equipped Jeep handled very well on the trails. Jenny enjoyed the extra clearance that she got from removing the spacers as well.

[phpbay]slip yoke eliminator, 10[/phpbay]

Trail repair of Jeep Dana 30 Axle or U-joint

The Jeep Dana 30 axle will hold up under most conditions, but when you start adding larger tires and lockers as well as driving in more rugged terrain, there is always a chance something might break. Having the right tools and spare parts on board can save the day. A broken axle shaft or U-joint can be changed on the trail in about 20 minutes providing you are properly prepared.

Things you will need include; a jack, a spare shaft, a 13mm twelve point socket or wrench, a 36MM socket and something to turn it. You will also need the appropriate tools to remove your wheel and brake caliper. These vary from year to year and depending on your accessories. A hammer and a spare set of hub bolts will be helpful as well.

If your wheels have open centers, begin by removing the cotter key and the center nut on the axle shaft. This nut is very tight when tightened to specs. You will need either an impact wrench if you have on-board air or a long handled pull bar on the socket. If you have a closed center wheel, you will have to remove the wheel and have someone hold the brake while you loosen the nut.

Support the vehicle and remove the wheel. Remove the brake caliper and support it on the control arm. Try not to let it hang by the hose. Next, remove the brake rotor.

Using a 13mm 12 point socket, remove the three bolts that hold the bearing to the knuckle. The bearing will likely be stuck in the knuckle. My favorite way of removing it is to screw in some disposable bolts that have the same thread and hammer on the bolt heads. Once you hit the bolt head with a hammer, you will not be able to put a wrench on them in the future. I carry a set of bolts for this purpose in my axle repair kit.

If you don’t have spare bolts, you can still tap the bearing out using a hammer and pry bar. Try not to hit on the wheel mounting flange however as this can damage the bearing.

Slip the bearing out and then remove the broken shaft. If part of the shaft remains in the axle housing, use a magnet to remove it. If you can not pull it out with a magnet, you can also remove both shafts and push it out with a stick or long metal rod.

If you have jacked up the side you are working on high enough, you will not spill any axle grease. Even with it level, there should only be a small loss.

Slip in the spare shaft and check for any other damage. Put the bearing back in place and secure the three bolts. Place the rotor back on the hub and secure the brake caliper. Mount the wheel then tighten the center axle nut. Replace the retainer clip and cotter key.

Pump the brake pedal a couple of times to remove any slop that may have been introduced by removing the caliper before attempting to move the Jeep. Now get back to wheeling!
[phpbay]jeep axle, 10[/phpbay]