Almost Alloy kit for Dana 30 from Iron Rock

Almost Alloy kit

Almost Alloy kit for Dana 30 from Iron Rock

The weak link in my XJ has been the front axle U joints I have broken at least three of them. Every time it looks like the cap comes loose and hits the ball joint. Every time it takes the ears off the end of the shaft. I even lost a very expensive ARB shaft this way.

I have looked into the various ways to retain the caps better. There are full circle clips, or the caps can be welded in place. But none of these solutions add any strength to the ears. The ears seem to be the weak point to me. I am guessing the ear flexes and allows the cap to spin causing the clip to come off.


The Almost Alloy kit is a set of tabs that weld on over the ears reinforcing the area and trapping the cap in place. I like the extra strength the plates give to the ears.

I was very unsure about welding them over the caps. I am sure I will never be able to get them off if I need to replace the U joints. So I put in fresh U joints just to be sure. I packed in some extra grease to try to compensate for the grease that would be forced out by the heat of welding. I am not sure that helped at all, but it made me feel better.

I did several practice welds on some scrap that was about the same thickness as the plates to get the heat just right on my MIG. I then cleaned the ears really well with a flap disk and used some brake cleaner to make sure all the grease was gone in the weld area.

I centered the hole in the plate over the center of the U joint cap and welded both sides of the plates. It was not as difficult as I expected to weld to the cast ears.

I then ground down the excess weld bead as there is not a lot of extra room around where the yoke sits in the axle housing. There is plenty of room for the plates, but not for any excess weld bead.

Once the caps were welded, I cleaned up the assembly and put a light coat of paint on it. I then pulled my old axle shafts and replaced them with the armor-plated ones. I will keep the old shafts as spares. But hopefully, with the new protection, I won’t need them.


See ironrockoffroad.com for more info.

How to change the water pump on a 1999 Dodge Ram 5.9L

How to change the water pump on a 1999 Dodge Ram 5.9L

The RAM pickup has a huge fan shroud. Once it is out of the way, there is plenty of room to work on the water pump. However getting the fan shroud out is more complicated than just removing the four bolts.

First remove the upper radiator hose at the radiator. You can leave the other end attached to the engine. You will need some special hose clamp pliers to get it out anyway.

Remove the washer bottle by running a long screwdriver down between the bottle and the shroud. There are two tabs that lock into holes in the shroud. Once those are depressed, the bottle will slide straight up. Leave the hose and wire connected to the bottom and set it aside in the engine bay.

Do the same with the over flow bottle. Or you can just remove the hose and leave it attached to the shroud. Remove the four bolts but don’t lift out the shroud just yet.

Next you will have to unbolt the fan clutch. It is held by a single 36MM nut. It is a standard rotation, so you turn it counter clockwise to loosen it. It will likely be too tight to remove even with the special wrench available at the parts store loan a tool plan.

In order to properly hold the water pump pulley from turning you will need to obtain or fabricate a tool that fits in the holes of the pulley. They are 3 inches apart and a 5/16 bolt fits well. I made a tool using a piece of scrap metal and drilled two hole and put two bolts in it to hold the pulley. I was able to hold the pulley still but the thin specialty wrench spread apart before the nut turned. A large adjustable wrench would likely work, but my largest adjustable wrench was too small to fit the nut. On the advice of the parts store counter rep, I used an air chisel. Mine came with a tool that had a notch that caught the edge of the nut well. Using that tool, I was able to get the nut to turn. I made quite a mess of one flat of the nut however.

The fan and shroud are lifted out as a unit. Note that the shop manual warns against laying the fan flat while it is off. They say the fluid can drain into the bearing area causing damage. After cleaning up the damaged flat with a file I carefully propped up the fan in its normal position while it was off.

I then removed the serpentine belt. I used a socket on the tensioner and pulled it to the side releasing he belt. There was a sticker showing the belt routing on this truck so I did not have to worry about making a drawing of the routing before I removed the belt.

With the fan and shroud out of the way, the bolts are easy to get to. Note that there are four long ones. Pay attention to which holes these come out of. In order to avoid a mess, you can drain the radiator before removing the bottom hose. One of the lower bolts goes into the water jacket as well and will drain more fluid.

Once all the bolts are out, you will have to deal with the annoying hose at the top of the water pump. I was able to use vise grips to move the clamp up enough to get it loose. It took a lot of pulling and twisting to get the hose to break free from the nipple. However one it was loose, the pump was free. Replacing this hose requires removing the AC and alternator bracket. So be careful with it.

I used a scraper and wire brush to remove all the old gasket material from the block. I then assembled the new water pump. I obtained a new outlet pipe rather than trying to reuse the old one. I let it out however until the pump was bolted in place. I screwed in the new water nipple using a large flat screwdriver. The nipple came pre coated in thread sealant. Next, I used Permatex #2 to glue the gasket to the pump. I knew that I would have to do a lot of wiggling to get the nipple back into the small hose and I did not want the gasket falling off.

I then slipped the nipple into the hose and started a couple of bolts. Then, I made sure I could get the hose on properly and the clamp into place. I then installed the rest of the bolts and torqued them evenly. I pressed in the new outlet pipe and secured it with its mounting bolt. Next, I installed the lower radiator hose. I then reinstalled the belt.

I held the fan inside the shroud and slipped them into the truck together. Working through the front of the shroud, I started the nut onto the water pump. I spun it a few turns and then installed the shroud. I used the fan clutch wrench from the parts store loan a tool program to tighten the clutch nut. I then reattached the fan shroud and the two water bottles.

I reconnected the upper radiator hose and then refilled the system with coolant. After checking for leaks, I started the engine and continued filling the system as the engine warmed up. The belt had been soaked in coolant from the leaking pump so it slipped some at first. As it dried out however it seemed to work fine.

How to change the Fluid and Filter in a Jeep Cherokee AW4 transmission

How to change the Fluid and Filter in a Jeep Cherokee AW4 transmission

My Cherokee was long overdue for a fluid and filter change. While I have changed the filter for many others I have neglected my own for far too long. I finally decided to remedy that and with over 360,000 miles on the odometer, I finally decided to open the case.

The transmission pan has the dip tube attached to it. Ideally, you can leave the dip tube attached to the bell housing and just remove the pan. This seldom works for me. So before I lifted the Jeep, I removed the 13mm headed bolt that holds the dip tube to the bell housing.

I continued by supporting the transfer case on a stand and removing the cross member. The transmission mount is held in place by for nuts with 13mm heads. A deep socket is helpful to get them loose. Then the cross member is held to eh body by four 15mm fasteners. While it appears you can get to the back bolts with the cross member in place, you really can’t and it saves time overall to just remove the cross member.

Next I removed the drain plug and let the oil fluid drain out. It was pretty dark but looked OK.

I then used a wire brush and a scraper to remove years of dirt and mud off the pan bolts. It took a while to find them all. While cleaning, I took the new gasket out of the box and laid it in the sun and set some weights on it to try to flatten in out. It was pretty wrinkled in the box.

Once I found all the bolts, I counted the holes in the new gasket to know how many I was looking for; I removed them with a 10mm socket. I had to pry the pan gently away for then bottom of the transmission. As usual, I bent on corner before it separated from the sealant.

With the pan loose, I twisted the dip tube around to allow the clip to clear the bell housing and removed it as a unit. Once it was on the floor, I was able to pull the pipe out.

Next I removed the bolts that held the filter in place and carefully removed it. The old gasket stuck to the transmission so I had to scrape it off. It inspected the old filter and lit looked fairly clean. I installed the new filter with the original bolts.

I removed and cleaned the two magnets in the pan. There was very little metal on them. Not bad at all for 360,000 miles. After wiping out the pan, I took it to the anvil and straightened the corner I bent getting it loose. I then used a wire brush to clean the remainder of the old sealant off the pan.

I used a scraper to clean the bottom of the transmission. I then replaced the magnets in the pan. I slid the dip tube up into its approximate position. I then had to use a heat gun to get the gasket flat enough to work with. I started four bolts in to the pan to hold the corners of the gasket in place.

I then started all the bolts before running any of them down. I had to wiggle the pan around some to get all the gasket holes to line up properly. Once they were all in place, I tightened them gently to compress the gasket evenly. I then set the dip tune in place and pushed it down as best I could from below. I reinstalled the drain plug and cross member. After lowering the Jeep, I pushed the dip tube fully into place and bolted it back to the bell housing.

I then added a gallon of Dextron ATF fluid and started the engine. Finding no leaks, I let it warm up a while and re checked the level. It was just about right.

I was disappointed that the slight hesitation I had when cold was not corrected by the fluid and filter change however. Even after a week of driving with fresh fluid, it still too a few extra seconds to engage reverse on cold mornings.

On the advice of a mechanic friend, I added a bottle of Trans X to the fluid. I have always been very reluctant to try to solve performance issues with chemicals but he assured it me it would do no harm to try. So I poured it in and hoped for the best.

After a few days the transmission was back to its old self with no more hesitation on cold mornings. Hopefully it was just a sticky spot and all will be well for another 100,000 miles or so.

Heater Treater Blend Door Repair

Heater Treater Blend Door Repair

1999 Jeep Cherokee XJ

Janice’s Jeep Chreokee has had trouble regulating the temperature in the cabin. Eventually the warm / cool knob made no difference at all. It was cold all the time.

I remembered the previous experience of pulling the HVAC box to replace the heater core. That was a job I do not care to repeat. I also remembered that I had a lot of trouble getting the blend door to sit properly in its hinges when I reassembled the box.

I first checked the actuator and saw it moved in response to the knob on the dash. I had had trouble with my GMC Suburban that turned out to be the HVAC controller. Since the actuator was moving but the temperature was not changing, I knew something had to be wrong with the blend door.

A quick Google search showed this to be a common problem on the 97 to 01 Jeep Cherokees. The door is plastic and will break. Once I got mine out, I found it was indeed broken where the drive actuator engages it.

While searching for solutions, I found HeaterTreater.com. They offer a metal replacement blend door along with a procedure that allows the door to be replaced from the foot well without removing the box. At first, I thought the $119 price was high but it sounded better than removing the box again. Especially since the Freon has to be removed to pull the box.

I put the kit on my Paypal account and waited. It was shipped the same day I ordered but it did not arrive until the following Monday. So much for Priority Mail.

I borrowed my Dad’s Dremel kit as recommend in the instructions. The kit came with a cutting blade that looked like a drill bit. Dad’s kit had one similar but shorter so I used his instead.

I removed the passenger seat to get access. I was surprised that it is held in my SAE fasteners rather than metric. Janice had previously removed the actuator. That was the most time consuming part of the job. The actuator is held in place by three screws with 8mm heads. (Not two Phillips screws as stated in the instructions.) Two are almost impossible to access. I used a short socket on a ¼ inch drive ratchet. Even with that I had to pull the carpet back to get enough room.

I cut out the template from the instructions. It is a nice pattern and well thought out. I would not make the hole any different after seeing inside. At first, I could not find a way to transfer the pattern onto the black box to make the cut. It was very difficult to see in the dark floor board and then was little room to get a light in there with me.

My final solution was to transfer the pattern onto a piece of the provided silver tape. They sent plenty. I then stuck the tape to the box and used that as a guide to cut along.

I had not used the Dremel before or used a drill bit as a cutting tool. It was very messy and I would advise goggles or a face shield. Regular safety glasses don’t provide enough protection as the plastic chips fly everywhere and there is not much space between your face and the cutting. After some experimenting, I found it best to make several shallow cuts rather than trying to plunge in and make the cut all at once.

I made a pretty messy cut but was able to get the section cut out properly. As they note in the instructions, it does not have to be neat as it will be covered by tape when you are done anyway.

With the section removed, I could see my blend door hanging at an odd angle. It was not seated in the upper pivot point. At this point I considered putting it back in place and returning the Heater Treater Door. However, upon closer inspection I saw where it was broken. I was able to get it out without making the additional cut noted in the instructions. I guess I was lucky as they said.

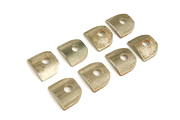
Next I took a close look at the replacement door and compared it to the original. There are some minor differences in the shape. The major difference is in the material of construction however. The original is flimsy plastic and the replacement is metal covered in foam. The replacement also has a removable axle to allow it to be inserted and removed without separating the box halves. All the stressed parts are made of steel or aluminum. It looked very strong.

Putting the door in place took me several tries. The top has to fit in the pivot point at the top of the box. The instructions describe the procedure but it took me several attempts before it popped into place. Then it promptly fell out and I had to do it all over again.

The most difficult part of the whole procedure was then putting the little nylon washer in place. I had a very difficult time finding a way to position my hands to get the washer placed under the shaft and over the hole without letting the door slip out of the upper pivot. I am not sure how I eventually did it, but I finally got it all in place.

The axle shaft will fit in two ways only one of which is correct. I hooked up the actuator to the wire again and rotated it to the centering mark on the actuator by turning the hot cold knob on the dash. I removed the wire again and slipped the axle shaft into the actuator. I then carefully raised the actuator and shaft into the hole and wiggled the door to let it slide down on the axle.

I then rotated the actuator to align the screw holes and put in the one screw that is easy to get to. I reattached the wire and tested the actuator. The door moved nicely from one end to the other.

I then sealed up the hole. I tore two pieces of tape and placed them on the bottom of the cut out piece. I then pressed the cut out into the hole and pressed down the tape on either side. It does not look perfect, but you can’t see it unless you lay in the floor anyway.

I then let Janice put back the other two screws holding the actuator. I then reinstalled the seat. She will now have heat for holiday traveling. She now just has to clean up all the black plastic shavings. I even had them in my ears.

Overall, I found the Heater Treater well worth the price. The instructions were very clear and easy to follow. The template was just the right shape to make the repair. Cutting the box sure beats removing the box. See www.HeaterTreater.com for more info. Allow about two hours to make the repair.

2012 Fall Crawl

2012 Fall Crawl

With my new job, my time commitments are tight. So, I made a last minute decision to attend the XJ list Fall Crawl. That meant I did not have time to prep my trailer and my Jeep. I decided to borrow Jennifer’s XJ which had until recently been her daily driver.

I made the assumption it was ready to drive and just spent the time unpacking her stuff and packing in my camping gear. Having grown accustomed to packing a Suburban, I had to rethink some choices when packing the smaller XJ. The 33 inch spare took up a lot of room even wit he seat folded down. Since I was traveling alone, I used the front seat space for a few soft items like my sleeping bag and backpack.

I left early Friday morning. I made it to the camp in Harlan just as the guys who arrived Thursday night were waking up. I aired down and disconnected the sway bar. I then unloaded the camping gear and set up the tent. I then took my chair to the camp fire and caught up with everyone I had not seen in a while.

After lunch, we lined up and headed up the mountain. I was surprised to see that part of trail 45 is now closed and we were forced to use the trail 48 bypass. Even with the bypass, getting up the hill is still a bit spooky in a couple of places.

At middle fork, we took a look at Tailgate. There was a huge buck deer looking back at us. It just stood there staring at us as we investigated the climb. Only after Josh restarted his XJ and turned p the hill did the big deer slowly wander away. The wet leaves proved too slippery to get on onto the bottom of the trail which looked pretty unforgiving further up. So, we turned and headed up trail 15 to the left toward the helicopter pad. After exploring the remains of an abandoned earth mover, we ventured further east to the huge plateau that we found a few years ago. There was still snow in several places and I chucked a couple of snowballs.

A couple of XJs were low on fuel so we split in to two groups. While one group headed to Evart for fuel, I led the others on a round about way to Lower Rock garden. We took trail 15 back to middle fork and then took the other side of 15 up slip and slide and then up the next big hill. Slip and slide was pretty dry but the second longer hill was pretty slick. I was very happy with how well Jenny’s XJ climbed in the slippery mud. Also her new Procomp shocks did very well at controlling the front axle over the rock outcrops.

Some of the newer participants had some trouble at first as they did not realize how aggressive they need to hit the bottom of the climb to be able to carry speed to the steep part. After a couple of tries every one made it up.

We then made our way to the lower rock garden. We played around there for a while until the others caught up. It was pretty dark by the time we headed back to camp. We went back along the easier trial 12 and 20 back to camp. Going down 45 was pretty exciting as the switchbacks took a careful line to drop into without feeling tippy.

Back at camp we made our individual meals and swapped stories. As usual, the stars were extremely bright on top of the mountain far away from light pollution.

After a chilly night we headed up the mountain again. We decided to try the far west side of the part as one of the county officials had suggested. He told us that some of the ATV trails were OK for our size Jeeps. We navigated our way across the park making only one wrong turn before we got to a confusing spot and took time out for lunch. I used the manifold to warm some hot pockets which were very tasty on the cool clear day.

We made our best guess at which trail to take and ventured on. Not far in we found a spot a bit too narrow for an XJ. A fallen tree was blocking one side of the trial. Josh used his XJ like a bull dozer and moved the log aside. However he got hung up backing out and Dean had to give him a tug to get free.

After a long while of continuously going down we decided this was not taking us where we wanted to go. We could see the Harlan High School below us. Eventually we found a place to turn all the rigs around and made the long climb back out. We took another narrow trial toward the southern part of the park. Again we encountered a tree blocking the road and Josh again pushed it out of the way.

There was one particularly challenging rock that took some maneuvering to get around but generally the trail was uneventful. We were all glad to be of the narrow trail by the end. We stopped at 4 poles overlook and enjoyed the view.

Next we decided to try some trials we had not been on before. We turned up Fuqarwe and then onto Fly Trap. Neither proved to be much of a challenge. We then made our way along 12 to the unnamed rock garden.

We gain split into two groups with one group taking Frankenstein and the others going to Little Stadium. The group on Frankenstein had some excitement as Dean broke a hub and Frosty took a tumble. We all met back up on trail 12 and headed back down. We made it to camp just about dark.

Frosty fired up his grill and tossed on some juicy rib eye steaks. Potato boats surrounded the cooking surface as well. Once it was all cooked, the conversation died down and was replaced with grunts, oohs and compliments to the chef.

After a nice dinner and some story telling I retired to the tent and slept very well. I woke early the next morning and packed my gear. At the bottom of the hill, I aired up using the camp compressor. After hooking back up the sway bar, I pointed the red Jeep south basking in the memory of a nice relaxing weekend.